
Monday, 28 October 2013
Foto HDR Pemenang Kontes World Press 2012
Dunia Fotografi - Ada sesuatu yang berbeda pada dunia foto jurnalisme ketika pemenang kontes World Press Photo 2012 menggunakan teknik kamar gelap yang berbeda dibandingkan biasanya. Foto hebat dibawah ini adalah karya dari Paul Hansen, seorang fotografer dari Swedia. Foto ini menggambarkan Dua anak palestina yang terbunuh di Gaza oleh serangan misil Israel, dan mereka tengah dibopong menuju ke pemakaman. Foto yang mencengangkan! foto tersebut benar-benar memiliki sense cinematic, kenyataan dan drama melebur menjadi satu.
Photo by: Paul Hansen - World Press Photo 2012 Winner
Banyak orang beranggapan bahwa foto tersebut telah di-set sedemikian rupa, baik pencahayaan maupun komposisinya. Fotografer Paul Hansen menjelaskan teknik yang dia gunakan. Dia memotret menggunakan format "RAW' dan Hanya dengan menggunakan satu frame, dia menggunakan alat bantu perangkat lunak dan memproduksi beberapa versi foto dengan beberapa variasi tonal, beberapa dengan kontras tinggi, kontras rendah. Variasi foto tersebut dikombinasikan sehingga foto memiliki range tonal yang lebih kaya dari format "RAW". Teknik yang digunakan sering dikenal dengan High Dynamic Range atau foto HDR.
Mengenai tanggapan negatif pada foto tersebut, Hansen mengatakan bahwa foto tersebut bukanlah palsu atau dibuat-buat!". Teknik HDR ini biasanya menggunakan lebih dari satu frame dari satu subyek yang sama, tetapi hebatnya Hansen hanya menggunakan satu frame dalam foto tersebut.
Santiago Lyon, Ketua juri kompetisi World Press yang juga sebagai direktur fotografer di Associated Press mengatakan bahwa teknik maupun post processing yang dilakukan Paul Hansen bisa diterima, kecuali jika proses yang dilakukan adalah merubah realita foto dengan cara menambah atau mengurangi elemen-elemen dalam foto mereka.
Kesimpulannya teknik-teknik post-produksi yang sedikit ekstrim seperti HDR, sekarang diperbolehkan dalam kompetisi foto jurnalisme. jadi siapa bilang fotografer dilarang menggunakan perangkat lunak editting gambar? menurut kami selama tidak merubah realita gambar yang ada.. kenapa tidak? We live in digital photography world.. :)
8 Tips Memotret Panning
8 Tips Memotret Panning
Panning adalah memotret dengan menggerakkan kamera searah dengan arah gerakan obyek yang ingin dibidik sehingga obyek akan tampak fokus sementara background tampak kabur. Jangan takut hanya karena ada kata ‘teknik’ diatas, berikut beberapa langkah praktis melakukan panning:
sms
1.Jangan gunakan tripod, untuk mengikuti arah gerakan obyek kamera harus bisa bergerak luwes
2.Set kamera pada mode Shutter Priority (S atau Tv)
3.Shutter speed yang digunakan untuk panning adalah antara 1/30 sampai dengan 1/8, jadi set kamera diantara angka tersebut
4.Cari obyek bergerak yang akan dipanning (tips: pilihlah background yang berwarna-warni untuk panning sehingga hasil blur dari
background makin menarik)
5.Arahkan kamera mengikuti obyek yang bergerak dan pencet separuh tombol release untuk mengambil fokus.
6.Usahakan tangan bergerak selembut mungkin, gerakan kejut yang mendadak bisa mengakibatkan hasil foto yang tidak menarik
7.Saat tangan kita sudah ‘seirama’ dengan gerakan obyek, pencet tombol release untuk mengambil eksposur
8.Makin banyak berlatih, tangan dan mata kita akan semakin terasah!
Monday, 16 September 2013
ADD BRILLIANT LIGHT EFFECTS TO YOUR WORK WITH PHOTOSHOP

Tutorial Resources
- Blanched Paper Textures from WeGraphics
- Dancer from Shutterstock
- light_effects_custombrushes (ZIP, 26.1 MB)
Step 1: Set up the background
Let’s start the tutorial by creating a new document (Ctrl/Cmd + N) in Photoshop. Since I like printing my work, I will typically choose a large standard document size (like A4) and set the Resolution at 300 pixels/inch
.
Once the new Photoshop document has been created, fill (Edit > Fill) the default Background layer with a dark blue (#052b4c).
I start my work from the background. If you do the same, I suggest that you don’t give too much importance to your starting colors because we can change them later on once we have completed our foreground work. The most important thing at the beginning is to achieve a concept—something interesting to represent. The beauty of Photoshop is that it allows you to change colors and other aspects of your work at any moment. The best moment to work with colors is when you have more elements to play with, near the end.
Let us start by creating a new layer (Crtl/Cmd + Shift + N). Next, set white (#ffffff) as your Foreground color and then select a large, soft brush tip with Hardness at 0% for our Brush Tool (B).
Simply click once at the center of the canvas to apply your brush stroke.Step 2: Create a simple ellipse light effect
Since the scene is focused at the center of the canvas, we are going to create a light effect that will enhance all elements that will be placed there. Press Ctrl/Cmd + T to activate the Free Transform command and contract the light source so that it becomes an ellipse.
Then, remove the edges of the brush stroke using the Eraser Tool (E) (or use a layer mask, if you want).Step 3: Create some clouds
We will now make some clouds. Make sure to have white (#ffffff) as foreground color and black (#000000) as your background color; you can press the D key to reset your foreground/background color to white/black and then press X to switch foreground and background colors.
Create a new layer and then go to Filter > Render > Clouds.
Activate the Free Transform command (Ctrl/Cmd+T) and enlarge the clouds layer by pulling on one of the corner transform controls.
Switch the layer’s blending mode to Screen to remove black parts of the clouds layer and also reduce the layer’s Opacity to around 30%.
To make the clouds more realistic, use the Eraser Tool (E) to remove some parts to make it look randomized. As always, use a large, soft brush with a Hardness set at 0%.
Just to recap our simple five-step clouds creation process: - Create a new layer and apply the clouds filter
- Enlarge the layer
- Switch the layer blending mode to screen
- Reduce opacity
- Remove unwanted parts


Repeat the same process to create other clouds. Try experimenting with different layer dimensions and opacity. This is what I ended up with:

Step 4: Select and prepare your subject
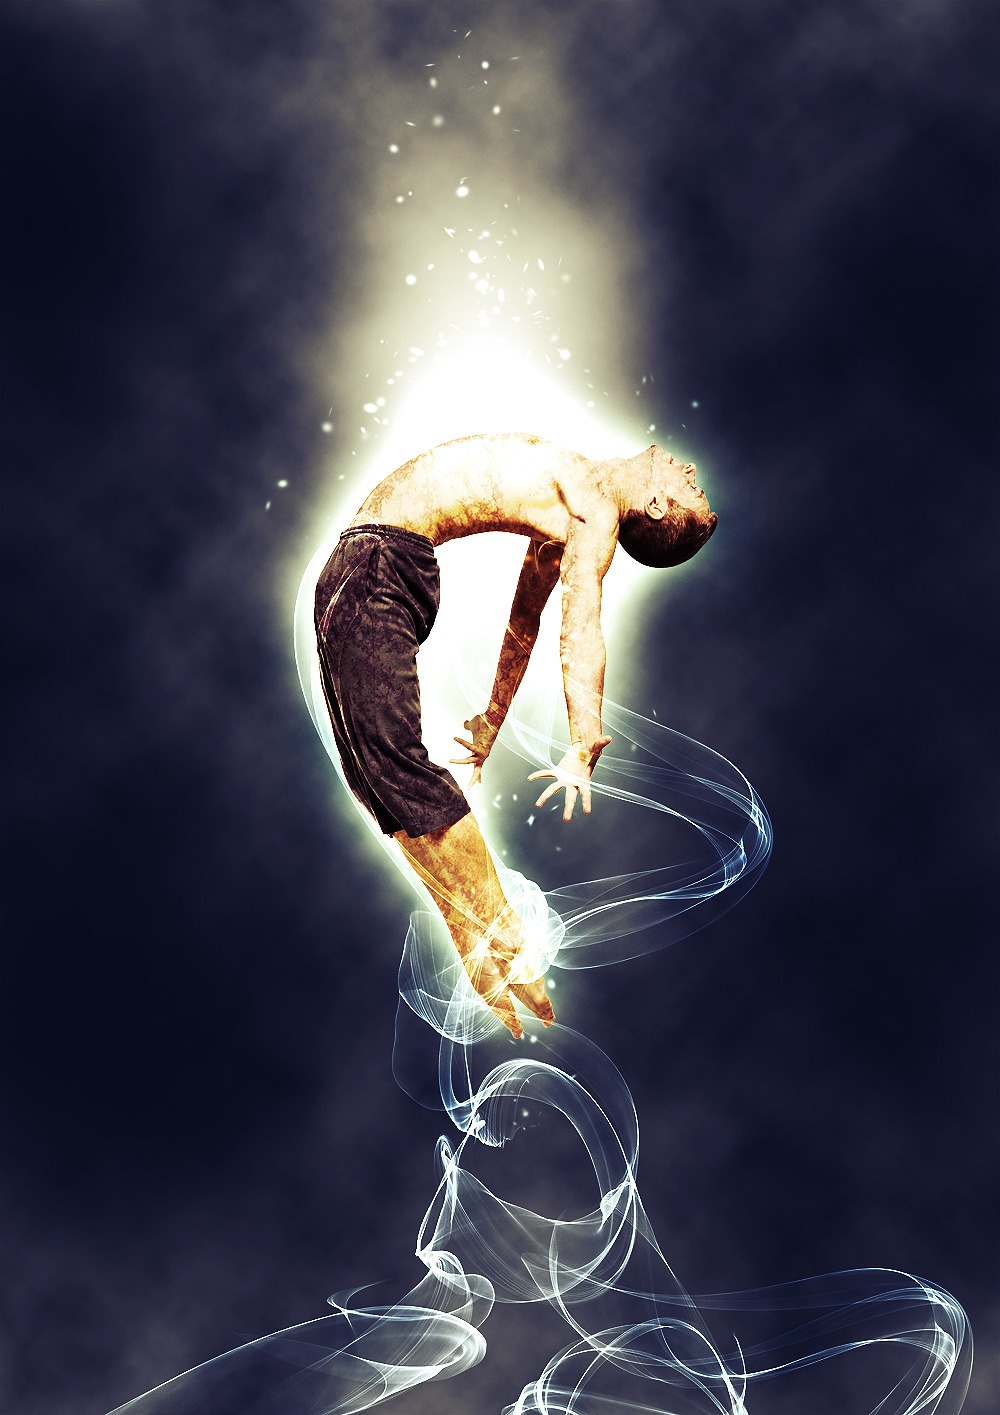
Choose a nice subject for your work. I chose this nice image of a dancer, but you can pick any image that you like or have lying around.Since we will create light effects to play with, I suggest you pick a dynamic moving subject such as a person jumping, an animal running, or a rock star jamming.
Once you’ve chosen your subject, copy and paste (Ctrl/Cmd + V) it into the canvas.

At this point, we have to modify the dancer. In particular, the aim is to increase the image contrast and to give the subject a grungier look. We can achieve both these results with a texture.
Firsst, you must download the free sample of my Bleached Paper Texture set, open it in Photoshop, and paste it into our document. Also, you can check out the Design Instruct Freebie section for other interesting textures to use.
Resize the texture with Free Transform (Ctrl/Cmd + T) so that it’s of the same size as our canvas.

Step 5: Apply a clipping mask on the texture layer
We want to apply our texture only to the subject. For this purpose, we can create a clipping mask. To do so, press Alt/Option and then click between the subject’s layer and the texture layer in the Layers Panel. A little arrow should appear and the texture layer’s name will move a bit to the right inside the Layers Panel indicating that you have added a clipping mask.The clipping mask means that all the things we do in the texture layer will affect only the area delimited by dancer’s silhouette.

Switch the texture layer’s blending mode to Overlay and reduce the Opacity to 70%.
Step 6: Change the texture’s color
You can see how the texture details nicely interact with the human body. If you zoom in (press Z to activate the Zoom Tool, and then click on the canvas), you will notice that the grunge texture looks like veins. I want to play around with this idea/concept.Let’s change the texture’s color. Press Ctrl/Cmd + U to open the Hue/Saturation dialog window. Check the Colorize option and move the hue slider to the area between purple and red.

Now create a mask on top of the texture layer by pressing the Add Layer Mask button at the bottom of the Layers Panel.
Next, grab a soft, black brush for our Brush Tool (B) and remove textures from some parts of the body. The image below will show you suggested parts to paint on:

Step 7: Add a vivid light effect
It’s time to add a more brilliant and prominent light effect. Right-click on the subject’s layer in the Layers Panel and then choose Blending Options from the contextual menu.Add an Outer Glow layer style. Increase the Size of the outer glow to around 200px and set Blend Mode to Color Dodge.

The light effect you see at the top is the result of the combination between the ellipse light effect we created at the beginning and the Outer Glow layer style.
If you want to change the orientation of this effect, simply move the elliptical lighting effect layer around.
Step 8: Create an abstract Photoshop brush
Here comes the fun part. There are plenty of ways to create light effects. In this tutorial, I’ll show you one of the simplest methods. We will make abstract fractals for our custom brushes and then we will use these brushes to add lights into our work.In order to create nice abstract fractal effect, we will use the flame tool, which is a free online tool made by Peter Blaskovic. This tool is amazing!

Create you own flames and save them to your computer. Use default colors and once finished, just press Save. Save your flame as a JPG image.
Open one of the flames you just created in Photoshop. We are going to create a cool brush set with these.

Desaturate the image by going to Image > Adjustments > Desaturate (Shift + Ctrl/Cmd + U).
Then invert the image by going to Image > Adjustments > Invert (Ctrl/Cmd + I). We invert the images because while you create Photoshop brushes, you have to consider that the white parts will be transparent and the blacker parts will represent the brush stroke. The parts that are in grayscale will therefore be the only ones saved as brushes.
Here is the result:

To save the brush, go to Edit > Define Brush Preset.
We have thus created the first brush of the set! Go ahead and create other brushes following the same process.

Step 9: Apply the custom abstract Photoshop brush
Create a new layer group (Ctrl/Cmd + G) and title it "light effect". Set the group’s blending mode to Color Dodge. Create a new layer (Ctrl/Cmd + Shift + N) inside the "light effect" group, set your Foreground color to white (#ffffff), and then click on the canvas to apply our custom abstract brush stroke.Here is your light effect! Really simple, don’t you agree? I promised it would only take 10 minutes!
If you want a stronger light effect, duplicate the layer (Ctrl/Cmd + J) and experiment with the layer’s blending mode.

You can now use all the brushes of the brush set you created. Try to combine them in harmony with the body of the subject.
Also try this: Create a new layer, apply an abstract brush stroke, then rotate it with the Free Transform command (Ctrl/Cmd + T). You can also flip the layer (Edit > Transform > Flip Horizontal or Edit > Transform > Flip Vertical). This can add variety to your abstract light effects.
Remember to create each brush stroke on a different layer so that you can move them separately to achieve a satisfactory composition.
Here is the result after I played around with all the brushes of my own set.

Step 10: Add more light effects
Still inside our "light effect" layer group, create a new layer (Ctrl/Cmd + J). This time we will use soft brushes to enhance some parts of the body. For example, take a look at the left hand of the dancer—it’s covered by some light beams. We can start there. Add more light where you think it’s necessary.
Step 11: Make energy particles
We will now create energy particles to detail our light effects. Create another layer inside the same group. Select the 16px Soft Mechanical tip.
Next, we will modify the Brushes options. If it’s not opened, toggle the Brushes Panel (Window > Brushes).
Check the Spacing option and increase its value to 400%.

Then, check the Shape Dynamic and set its options to the following values:

Finally, check Scattering and use the following suggested settings:

All that remains now is to paint over the canvas to create our energy particles. I suggest adding the energy particles on their own layers to compartmentalize our work. To increase the brightness and prominence of the energy particles, you can add an Outer Glow layer style to them.

Step 12: Final adjustments
Our work is almost complete. As I wrote at beginning of the tutorial, Photoshop allows us to play with colors at any moment.In another tutorial I wrote here on Design Instruct, I showed you the power of adjustment layers in Photoshop and how they can dramatically change our work. We will now follow a similar process to complete the work.
Hue/Saturation adjustment layer
Let’s start by desaturating our image a bit. This is something I often do because I’ll apply a Gradient Map later (with its blending mode set at Overlay) that will increase color contrast.Go to Layer > New Adjustment Layer > Hue/Saturation and reduce Saturation to -40.
Note that you can also add adjustment layers by clicking on the Create new fill or layer adjustment button located at the bottom of the Layers Panel.

Curves adjustment layer
Increase the image’s contrast using a Curves adjustment layer. Go to Layer > New Adjustment Layer > Curves. Create a curve as shown in the image below:
Gradient Map adjustment layer
Finally, add a Gradient Map adjustment layer. Set the color gradient so that it goes from purple (#6f156c) to yellow (#f9e600).
Afterwards, set the adjustment layer’s blending mode to Overlay and reduce its Opacity to 50%.
That’s it. We’re done!
Tutorial Summary
I showed you a variety of light effect techniques in this tutorial. We applied a simple light effect glow using a soft, white brush. Then we stepped it up a notch by adding an Outer Glow layer style on our subject. We created custom abstract light brushes as well as energy particles to enhance the look of our light effects. We applied a clipping mask to our subject for artistic purposes. To finish off our composition, we added some adjustment layers.I hope that you enjoyed this tutorial and learned a few tricks for adding light effects on your own work.
Here is the final result:
Cara gampang belajar Smudge Painting dengan Adobe Photoshop
Smudge painting dengan adobe photoshop
itu gambang-gampang susah. Dibilang gampang karena tool nya cuman
menggunakan smudge dan Filter aja. Susah nya karena harus mengikuti alur
dari guratan wajah nya dan ga semua orang sensitif dengan itu..
termasuk sayah hehehe..Untuk pertama kali mungkin nanti hasilnya gak
sesuai harapan Tapi asal sering dicoba, hasilnya pasti okeh.. !
Pertama buka file gambar yang mau di smudge. Idealnya gambar close Up wajah yang resolusinya bagus. Saya pake contoh gambar Barrack Obama.
Pertama buka file gambar yang mau di smudge. Idealnya gambar close Up wajah yang resolusinya bagus. Saya pake contoh gambar Barrack Obama.
Saturday, 17 August 2013
Cara Mengaktifkan Atau Mematikan Control Panel And PC Settings Pada Windows 8

Mungkin anda belum mengetahui Cara mengaktifkan atau mematikan Control Panel And PC Settings pada Windows 8. Tindakan mematikan Control panel merupakan hal yang biasa dilakukan oleh administrator jaringan komputer.Yang akkan saya jelaskan disini adalah cara melakukan di windows 8 dengan menggunakan Group Policy dan edit registry windows secara manual. Mematikan Control panel bisa anda lakukan untuk menghindari orang yang jail/ iseng mengubah pengaturan komputer yang ada pada sebuah jaringan komputer. Dengan mempelajari cara ini anda akan lebih mengetahui bagai mana cara ini bekerja, untuk jaga-jaga apabila Control Panel And PC Settings anda dimatikan dan anda ingin mengaktifkannya lagi.
Jalankan kotak dialog Run, caranya tekan tobol star pada keyboard (logo windows) + R, maka akan muncul kotak sialog Run kemudian ketik gpedit.msc dan tekan Enter.
Jalankan kotak dialog Run, caranya tekan tobol star pada keyboard (logo windows) + R, maka akan muncul kotak sialog Run kemudian ketik gpedit.msc dan tekan Enter.

Pada saat menu Local Group Policy Editor terbuka, pergilah ke:
User Configuration\Administrative Templates\Control Panel
Di bagian kanan jendela menu Local Group Policy Editor, Pada label Prohibit access to Control Panel and PC settings anda Klik dua kali.

Selanjutnya akan tampil seperti berikut, klik pada opsi Enabled.

Jika anda sudah selesai melakukan perubahan pada pengaturan diatas, lakukan refresh pada Local Group Policy. Caranya dengan mengetikkan perintah pada kotak dialog Run: gpupdate /force

Sekian pembahasan kali ini tentang Cara mengaktifkan atau mematikan Control Panel And PC Settings pada Windows 8 semoga bermanfaat.
Menampilkan Tombol Restart dan shutdown di Start Menu di Windows 8
Informasi yang akan saya sampaikan kali ini adalah tentang cara Menampilkan Tombol Restart dan shutdown di Start Menu windows 8. Jika kita lihat pada windows 7 telah tersedia tombol power di start menunya namun kita tidak akan melihat tombol tersebut secara default di windows 8. Kita pasti akan sedikit kesulitan jika ingin mematikan komputer di windows 8, di windows 8 untuk melakukan proses shutdown anda harus menekan tobol jendela dan klik pada profil untuk melihat jendela 8 ikon keluar. Jika anda ingin lebih mudah untuk melakukan proses shutdown maka anda harus menambahkan tobol shutdown di taskbar, selain itu anda juga bisa menempatkannya di start menu (Retro UI) maka dengan cara itu windows 8 akan lebih mudah digunakan.

Berikut ini adalah Cara Menampilkan Tombol Restart di Start Menu Windows 8:
1. Pada desktop anda klik kanan kemudian pilih "New Shortcut".
2. Setelah itu tulis "shutdown /r /t 0" (tampa tanda petik), kemudian untuk melanjutkan klik Next.
3. Masukkan nama "Restart" (tanpa tanda petik) kemudian klik pada tombol finish. maka shortcut akan muncul di desktop Windows 8.
4. Selanjutnya anda Klik kanan pada shortcut tersebut pilih properties lalu pilih tab icon maka akan tampil messagebox "shutdown.exe contain no icon" anda klik OK.
5. Setelah itu anda pilih salah satu icon yang telah di sediakan.
6. Maka Anda akan melihat tombol shortcut Restart di desktop Anda.
7. Jika ingin menampilkan pada start menu Metro UI, caranya klik kanan dan pilih Pin to Start.
Jika ingin menambahkan tombol shutdown caranya sama tinggal ubah saja perintah pada langkah ke 2 menjadi �shutdown /s /t 0� dan uabah pada nama pada langkah ke 3 menjadi Shutdown.
Demikian informasi yang dapat saya sampaikan kali ini tentang cara Menampilkan Tombol Restart dan shutdown di Start Menu di Windows 8.